Hi Prim Friends,

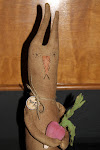
Few days ago, I participated in the Prairie Swap that Amy from Bumble Bee Lane Cottage was hosting in her blog and I sent her this Prairie Ditty Bag as part of my gifts. Also, you can see pictures of it in her swap post ( link above).


It is a simple ditty bag but with a little of imagination, you will used during whole year. Also, It will be an awesome gift for your prim friends this Christmas.
Materials:
- Fabrics - I used 3 different.
- First Muslin - Cut a piece of fabric of 20" by 7 1/2" for the bag. Another piece for the little doll, 4 1/2"by 7". I used Muslin for this project but you can use a osnaburg or a printed calico as well.
- Second - Beautiful stripe fabric in light cinnamon and beige color. Cut a piece 5 1/2" by 4 1/2 ". This will be used for a little pocket.
- Third - Brown wool, I will used this for the clothes.
- Coffee and Cinnamon ( For staining purposes)
- Embroidery floss ( Cinnamon, Black and White)
- Acrylic Paint - Black
- Wool ( I used real sheep wool ), Felting needles.
- Sewing Machine, of course
- Jute
- Polyfill
- Strip of flannel
- Berries
- Sweet Annie

Procedure:
To make the bag, fold fabric in half then sew 3 of the sides of it leaving one side open. Now we are ready to make the hem. Fold the open side about 3/4", stitch it leaving about 1/2"open in a side.


If you make the ditty bag in a neutral color like mine, you can used it around the year. See more photos with ideas on how to use it during the year.
- With Sweet Annie and a little crow


Hope you enjoy my new tutorial, please, if you make some ditty bags share your pictures with me. I loved to know that tutorials and/or items I made with love for you are enjoyed in your homes.
Hugs and see you soon,
Evelyn